Category Archives: How-To Guides

Fully Integrate your car kit with Unika from Parrot

The Parrot MKi range of Car Kits are still the best car kits on the market. They’re fully compatible with just about every handset out there and no other Bluetooth Car Kit can come close to them on the number of features. With them being this great, you’d think that it’s not possible to make them much better, but Parrot have raised the bar again and introduced the Parrot Unika to further enhance the MKi Car Kits and allow you to fully control them using the controls already fitted to your steering wheel.

Fully integrate your Parrot MKi Car Kit with Unika

Parrot Unika integrates your Parrot MKi Car Kit with your Steering Wheel Controls

As standard the MKi car kits include a wireless remote control that will let you answer and end calls, activate voice dialling, control music playback and adjust the volume of calls and music which is great, but finding somewhere to mount the remote in car can be a little bit tricky.

Parrot Remote can be mounted on steering wheel or dashboard

Parrot Remote can be mounted on steering wheel

The MKi Car kits come with a couple of mounting options for the remote control – an adjustable strap that lets you attach it to your steering wheel or an adhesive plate that you can stick to the dash of your car. Both of these mounting options are good, but you can’t beat the stereo controls built into the steering wheel of your car. I’ve had the MKi9000 in my car for about a year now and I still try to adjust the volume with the stereo controls instead of the Parrot Remote.

Since the launch of the MKi series last year, the technical team at Parrot have been working hard to fully integrate the kits into cars and have just released the Unika – an additional control box that allows you to connect the Mki & RKi Car Kits to the stereo controls on your steering wheel, completely eliminating the need to use the remote control.

The Unika can be fitted to most vehicles, and if you’ve already got an MKi car kit fitted you can retro-fit one to your car without too much hassle. If you’re technically minded you should be able to fit it yourself, although you will probably need to remove some parts of your dashboard, I’ve just changed my car and didn’t fancy pulling it apart, so I got AutoTec to fit mine for me. The cost for the Mki9000 car kit, Parrot Adapter Cable, Parrot Unika and fitting worked out at £279. The kit and accessories on their own add up to about £210, so fitting was only about 70 quid which I think is more than reasonable.

Unika is compatible with Vauxhall, BMW, Ford & Honda Steering Wheel controls

Unika is compatible with Vauxhall, BMW, Ford & Honda Steering Wheel controls

Once installed, the Unika will use the the buttons on your steering wheel to control the kit instead of the remote control. The buttons that you use for each function will vary depending on your vehicle, and you don’t need to have any phone buttons on the steering wheel as the Unika will ‘re-map’ the functions of the steering wheel controls when connected to your phone or iPod. When you’re phones’ not connected you’ll be able to use the controls to operate your radio or CD player as normal.

You can check to see if your car is compatible and find out which buttons perform which function in your car on the Parrot Unika Support Site.

At the time of writing this post, these were the prices for the kit and accessories:

I’ve had mine in for a couple of days now, and I’m still getting familiar with the controls, so I’ll update this post in a couple of days time to give you an idea on how well it works.

Syncing your iPhone contacts to your Car Kit

Visit unofficialmobileblog.co.uk for the latest posts

Visit unofficialmobileblog.co.uk for the latest posts

Bluetooth Car Kits are getting smarter, and most of them now support synchronising the contacts stored on your phone to the car kit to enable faster dialling, caller display, and enabling voice control – even on phones like the iPhone 3G that doesn’t support voice dialling. As great as this is though, it’s not quite as straight forward as you’d think as there are two different ways that phones and car kits talk to each other. I’ll apologise now if this gets a little confusing, but I’ll try and keep it as simple as I can.

Although Bluetooth is a pretty generic technology, there are a number of different bluetooth profiles and each bluetooth device uses different ones. The two that are needed to synchronise your contacts between your car kit and your phone are either PBAP – Phone Book Access Profile or OPP – Object Push Profile, but in order for it to sync, both the phone and the car kit need to support the same profile.

  • OPP – Object Push Profile – This is an older Bluetooth Profile, so should be supported by most phones and car kits that support contact sync. If the car kit supports the OPP profile then it is capable of receiving information that is sent or ‘pushed’ to it. In order to send your contacts to a car kit that uses OPP you will need to initiate the transfer of your contacts from your phone, either one by one or all at once. The only downside to this is that not all phones support sending your entire phonebook in one go.
  • PBAP – Phone Book Access Profile – This profile is one of the more recent Bluetooth Profiles, so not all phones or car kits support it. The advantage of the PBAP profile is that you don’t need to send your contacts to the car kit, the car kit will retrieve them from your phone automatically every time you connect.

Bluetooth support is limited on the iPhone and although it’s improving, it still doesn’t support all Bluetooth profiles – in particular the OPP profile. There is no way of sending any information from an iPhone over Bluetooth. This means that if you have a Bluetooth Car Kit that only supports OPP, you’ll only be able to use the car kit for calls, although features such as last number redial should still work fine. The iPhone does support the PBAP profile though – in fact it supports it brilliantly, so if you want to be able to sync your contacts make sure that the car kit you buy supports the PBAP profile, it should be listed in the technical spec of the user manual.

I’ve got the Parrot MKi9000 installed in my car and every time the car is started and my iPhone 3G connects, the kit checks my phone for any changes and and updates itself. Like I said before, the iPhone supports PBAP brilliantly, and when paired with a compatible car kit it gives you control over the information that is synchronised with the kit. You can chose which groups of contacts to sync – if any, as well as recent calls and favourites.

iPhone Car Kit Sync Options

iPhone Car Kit Sync Options - iPhone OS 3.1

From personal experience I’ve found that the best car kits for syncing your contacts are those made by Parrot. As well as supporting the iPhone fully, they also feature Text to Speech technology that announces the callers name when you receive a call and some will allow you to use voice dialling – even on the iPhone. It does this by matching the wave print of what you say against the Text to Speech wave prints for the contacts stored in the car kit. Most voice dialling kits require you to train your voice to them or to record your own voice tags for the contacts, and this normally doesn’t work too well. The current Parrot car kits that do all this are listed below. If you want more information on any of the kits, just click on the image or read my post on Parrot Car Kits.

Parrot MKi9200 Fully Fitted Car Kit

Parrot MKi9200 Fully Fitted Bluetooth Car Kit

Parrot MKi9100 Fully Fitted Bluetooth Car Kit

Parrot MKi9100 Fully Fitted Bluetooth Car Kit

Parrot MKi9000 Fully Fitted Bluetooth Car Kit

Parrot MKi9000 Fully Fitted Bluetooth Car Kit

Parrot CK3000 Portable Bluetooth Car Kit

Parrot MK6000 Fully Fitted Bluetooth Car Kit

Parrot Minikit Portable Bluetooth Car Kit

Parrot Minikit Slim Portable Bluetooth Car Kit

Parrot Minikit Chic Portable Bluetooth Car Kit

Parrot Minikit Chic Portable Bluetooth Car Kit

How to find your Nokia Model Number

Visit unofficialmobileblog.co.uk for the latest posts

Visit unofficialmobileblog.co.uk for the latest posts


Nokia have the largest handset range of handsets out of all of the mobile phone manufacturers and I’ve recently started to think that most of their handsets are all looking pretty similar. While it’s nice that Nokia phones all have the same look and feel, it does make finding the right accessories for your Nokia phone a bit tricky – especially if you don’t know the model number of your phone.

Nokia have tried to keep it relatively simple over the years by dividing their handsets up in to ‘series’ or ranges. I’d say that the most well known range is the more recent N-Series, but every one of their handsets belong to a series of handsets whether it be 1000 series, 2000 series etc, where the series is determined by the first digit of the model number. Interestingly they’ve never done any phones starting with a 4 – anyone know why?

This short guide will show you a few quick and easy ways to work out which Nokia phone you have.

Check your phone

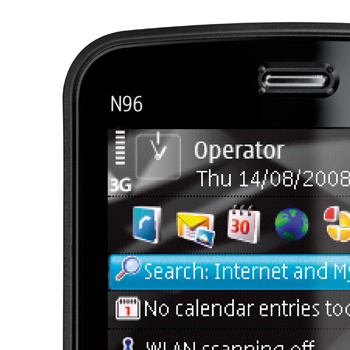
Some phones have the model number printed above the screen

Nokia N96 Model number printed above screen

This might seem like a really obvious thing to suggest, but some Nokia handsets will have their model number printed on the housing somewhere.  If you have bought your Nokia direct from your network, you may find that the model number has been replaced with the networks logo. If this is the case – try the next step:

Continue reading

Use your iPhone as a Modem

Visit unofficialmobileblog.co.uk for the latest posts

Visit unofficialmobileblog.co.uk for the latest posts


Along with Stereo Bluetooth, one of the other big new features of iPhone OS 3.0 is the ability to use your iPhone as a modem with your Mac, PC or Laptop.

Tethering your iPhone is as easy as using a Mobile Broadband Dongle. You enable Internet Tethering on your iPhone, connect it to your computer using your USB Cable and away you go.

Use your iPhone as a Modem

Use your iPhone as a Modem

If you want to avoid having to rummage around in your bag for your USB Cable you can also connect your phone using Bluetooth – most Mac’s have Bluetooth built in as standard but PC’s don’t so you might need to get yourself a Bluetooth Dongle.  The process is just as simple using bluetooth and takes no time at all to set up. All you need is the latest version of iTunes.

Connecting with the USB cable is just a case of enabling tethering on your iPhone and plugging it in to your computer. After a few seconds you’ll be connected and see the blue tethering bar across the top of your screen.

Using Bluetooth is slightly different and the exact process will vary slightly depending on the Bluetooth Dongle that you are using, but this is how to tether your iPhone 3G to Windows using Bluetooth:

  1. Turn on Bluetooth & Tethering on your iPhone
  2. Search for Bluetooth Devices on your PC
  3. Find your iPhone and enter a Passkey of your choice
  4. Enter the same Passkey on your iPhone
  5. If asked to select services for device, select PAN or Network Access
  6. Device will install and connect to your iPhone
  7. Blue Band will show at top of iPhone home screen when PC is connected to your phone

The whole process is amazingly simple and I have to admit, this was about the easiest phone I’ve ever set up for use as a modem.  There are no drivers to install and no complicated network settings to enter, you just connect using Bluetooth and it works.

Not Got Bluetooth?

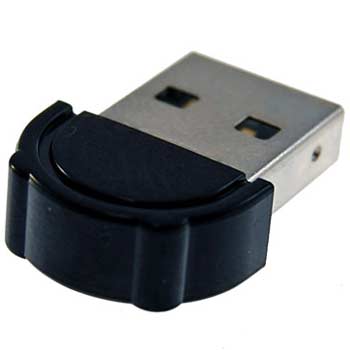
If you don’t have a Bluetooth enabled computer then don’t panic, it’s extremely easy to add Bluetooth to any PC. All you need is a USB Bluetooth Dongle.

Nano USB Bluetooth Dongle

Nano USB Bluetooth Dongle

Adding a Bluetooth Dongle to your PC won’t just help with tethering your iPhone, it will allow friends and family to send files and photo’s to your computer quickly and easily and you will be able to use a Bluetooth headset for making calls over Skype and listening to music.

Installing a dongle is quick and easy and you don’t need any knowledge of PC’s, just plug it in to a spare USB port and wait for Windows to set it up – Easy!

If you do have any problems setting it up, I’ve put a guide together on Installing your Bluetooth Dongle that will talk you through it step by step.

Don’t forget though, in order to use tethering, you will need to have the service activated by O2 and there is an extra monthly fee for the service.

How to update your iPhone or iPod Touch

Visit unofficialmobileblog.co.uk for the latest posts

Visit unofficialmobileblog.co.uk for the latest posts

Last night Apple released the long awaited iPhone OS 3.0 for iPhone and iPod Touch.  The update adds a number of new features to the latest versions of both devices, including adding support for Stereo Bluetooth Headphones and Speakers.

The update is free for iPhone 3G users, and there is a small charge of £5.99 for iPod Touch users.

To update your device, you need launch iTunes and connect your iPhone or iPod Touch.  Once it is recognised by iTunes, you need to select it from the list of devices and click on the summary tab.  Here you will see the option to ‘Check for Update’.

Continue reading

How to Boost your Mobile Broadband 3G Signal

Visit unofficialmobileblog.co.uk for the latest posts

Visit unofficialmobileblog.co.uk for the latest posts


High Gain 3G Antenna

High Gain 3G Antenna

One of the great things about Mobile Broadband is that you can go online anywhere you like – but you can almost guarantee that the place you need it the most is the place where signal is at its weakest.

While 3G coverage is getting stronger with all networks, there will still be blackspots where it drops out, or you can only pick up a 2G signal. Thankfully, a couple of solutions are now available to try and get round these signal issues. If you don’t have a dongle yet and are looking for the network with the strongest 3G signal, then the OFCOM website has just published updated coverage maps (as of 31/12/08) that allow you to view the 3G coverage by network.

There are now two different types of antenna available:

  • Clip Antenna: This Antenna is designed to be a portable solution that clips onto the screen on your laptop or sits on your desk. It is omni-directional, which means that it will pick up signals from all directions.
  • High Gain 3G Directional Antenna: This is a much more powerful signal booster than the clip antenna and is ideal for people who have real problems with 3G reception. They are directional, which means that you will need to point this towards your network’s transmitter in order for it to improve the signal. The High Gain antenna when positioned correctly will make a significant difference to the signal you receive and can be wall mounted as a permanent fixture.

Continue reading

Create free iPhone Ringtones using iTunes

Visit unofficialmobileblog.co.uk for the latest posts

Visit unofficialmobileblog.co.uk for the latest posts

Being able to choose your own ringtone on your phone is something that should be pretty easy, but not on the iPhone. Apple say that you can buy your ringtones through iTunes, but I’ve never found any on there. So how do you get round this? How do you get your own ringtone on your iPhone?

Its actually pretty simple, and even more importantly its free and legal! All you need to create your own ringtones is iTunes on a PC or Mac and a song in either MP3 or AAC format that is DRM free. DRM files are normally songs that have been purchased online from places such as the iTunes Store, or imported to your computer using Windows Media Player.

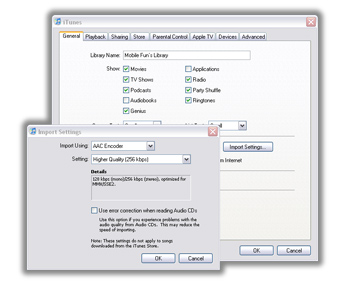
Change your Import settings to use AAC

Change your Import settings to use AAC

Before you start, you need to check some settings in iTunes. In the Preferences window, click on “Import Settings” on the General Tab and make sure that “import using” is set to AAC Encoder.

On a PC make sure you can see hiden files

On a PC make sure you can see hiden files

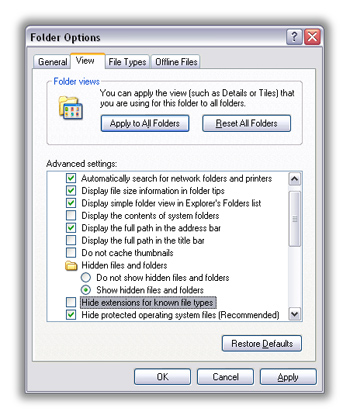
If you’re on a PC, you’ll need to make sure that you can view file extensions (music files should show .mp3 or .m4a after the filename). If your PC doesn’t, you can change this by opening your “My Documents” folder, and clicking Tools-> Folder Options. On the “View” tab, you should see an option “Hide extensions for known file types,” Make sure that the box next to this is not ticked, and then hit ok.

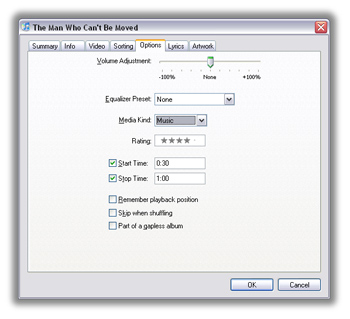
On the 'Get Info' screen, set your start and stop times

On the 'Get Info' screen, set your start and stop times

Right, now for the fun bit. Find the song you want as your ringtone and play it in iTunes. iPhone ringtones can be a maximum of 30 seconds long, so you’ll need to know the start and end points for the song clip that you want to use, so play the song, and write down how many seconds there are to the part of the song you want as your ringtone. You’ll need the end time too, but this can only be a maximum of 30 seconds.

By now, you should have the start and end points of your ringtone. Right click on the song in iTunes, and select “Get Info”

When the iTunes preferences window opens, you will see 7 tabs across the top, click on the options tab. You’ll see there is a space to enter start and stop times. Put in the times you wrote down earlier and make sure that both boxes are ticked – then hit “OK”.

UPDATE: Thanks to Dean and Snatch for pointing out that you need to ensure that you use : to seperate minutes and seconds, and not a full stop!

Right Click and select 'Create AAC Version'

Right Click and select 'Create AAC Version'

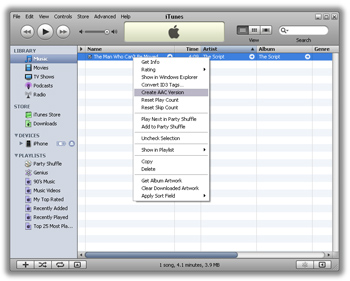
Right click your song again, and this time select create AAC version (or similar.)

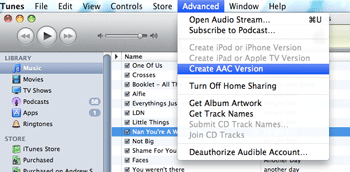
Update: iTunes 9.1 has moved this option from the right click menu – instead, you’ll need to click on ‘Advanced’ in the menu bar and select Create AAC Version

Create AAC has moved in iTunes 9.1

Create AAC has moved in iTunes 9.1

You should then see a second copy of the song appear in your iTunes music library. In order to change it to a ringtone you’ll need to drag this file to your desktop. You can then delete the 30 second version from iTunes and un tick the start and stop times on the original song.

Rename file extension from .m4a to .m4r

Rename file extension from .m4a to .m4r

Go to the file on your desktop and you should see its called “songname.m4a”. Right click it and choose “rename,” all we want to change here is the .m4a to .m4r. You can rename this song if you want, but the filename must end .m4r

Double click the file on your desktop to add it to your ringtones library

Double click the file on your desktop to add it to your ringtones library

That’s it! All you need to do now is double click the file to add it back to iTunes. If you click on the Ringtones link in the side panel, it should now be listed as a ringtone rather than a music file.

Sync your iPhone with iTunes to transfer the ringtone to your phone

Sync your iPhone with iTunes to transfer the ringtone to your phone

All that is left is to sync your iPhone with your computer. If it doesn’t sync over straight away, make sure the “Sync ringtones” option is selected when your phone is connected.

If you find that the ringtone is showing in the ringtones section of iTunes but isn’t syncing to your phone plug your iPhone in and go to the options screen. Uncheck the ‘Sync Ringtones’ box, hit apply and then sync your phone. Once it’s finished, disconnect and reconnect your phone. Go back to the options screen and re-check the ‘Sync Ringtones’ box and sync again. This resets the sync information in iTunes and your phone and your ringtones should now show up on your phone.

Give it a try and let me know how you get on – Got any great ringtones that you want to share with the world? Leave your comments below with the Song title and start/end times and share your creations!

How to download your Bluetooth Drivers

Visit unofficialmobileblog.co.uk for the latest posts

Visit unofficialmobileblog.co.uk for the latest posts


Installing Bluetooth Drivers:
In order for your new Bluetooth dongle to work correctly you will need to install some software or drivers to tell your computer how to use it. Windows XP Service Pack 2 has generic Bluetooth drivers built in to the operating system that will provide basic Bluetooth functionality but to make the most out of your dongle you will need to install specific drivers. This will then allow you to connect to other devices such as Bluetooth Headsets, Bluetooth Speakers, Photo Frames and Bluetooth Printers.

The software or drivers that are required are normally included on the CD that came with your dongle. If the disc has been lost or damaged, you can download the drivers using the links listed below – but only one of these drivers will work with your dongle and i’ve not yet figured out an easy way of determining which you need, so it’s a little bit hit and miss.

If your dongle uses the drivers by BlueSoleil then you normally only get a limited free trial. To continue using this software after the trial you have to pay for it. If you don’t want to pay for this software then install your Dongle using the drivers built in to the Windows operating system instead.

How to install your Bluetooth Dongle

Visit unofficialmobileblog.co.uk for the latest posts

Visit unofficialmobileblog.co.uk for the latest posts


Installing a Bluetooth Dongle to a PC Running Windows XP SP2:

Windows XP Service Pack 2 and 3 have generic Bluetooth drivers built into the operating system. While these drivers will provide you with basic Bluetooth functionality, you will only get the most out of your Dongle by installing the drivers that are supplied with it.

Installing generic Windows drivers:

Before beginning installation we would recommend that you visit the Microsoft Windows Update web site, to make sure your PC is up to date with the latest driver and security updates. Bluetooth drivers are built into Windows XP Service Pack 2 so an installation CD is not necessarily required.
To begin installation, insert the Bluetooth Dongle to a free USB port on your computer.

After a few seconds, you should see a yellow notification bubble by the clock. Windows will automatically begin to search for the necessary drivers and after a few minutes, the hardware will be installed and ready for use.

If Windows doesn’t have the necessary drivers, the add new hardware wizard will prompt you to insert the disc.

If this happens;

  • Place the disk into the CD drive.
  • Click next.
  • Follow the on screen prompts to install the drivers.
  • Restart the computer.

Your new Bluetooth Dongle is ready for use.

Installing specific drivers using supplied disc:
To install the drivers that are supplied with your new Dongle, follow these steps.

It is very important that you do not plug the Dongle into your computer until prompted to do so.

  • Insert the CD into your CD drive.
  • Disc should run automatically.
  • Follow the on screen prompts.
  • Insert the Dongle when prompted.

A series of yellow notification bubbles will appear by the clock as the drivers are installed. When installation is complete you will get a notification to say that the hardware has been successfully installed and is ready for use.

Installing Specific Drivers using downloaded drivers:
If you don’t have the software disc anymore or it has been damaged, you can download the drivers from the internet. The drivers needed vary from device to device. Download Bluetooth Dongle drivers. Once you have downloaded the file. Double click the Icon to begin the setup process. Follow the on screen prompts, and only insert the Dongle when prompted to do so. A series of yellow notification bubbles will appear by the clock as the drivers are installed. When installation is complete you will get a notification to say that the hardware has been successfully installed and is ready for use.